
For the third and final part of my Christmas food trilogy I’m going for one of my favourite Christmas treats - decorating the Christmas Cake!
I admit this isn’t really cooking, baking or anything like the stuffing or the cranberry sauce, but Christmas isn’t Christmas without the hulking, fruity, boozy cake. It is something I look forward to doing each year - and I’m doing this year’s tomorrow (think gingerbread men and little candy canes…
It can be quite a controversial thing decorating such an important cake, but don’t let this put you off. Even if your decorating skills aren’t quite as good as Messrs Marks or Spencer, don’t think people won’t appreciate the personal touch that home decorated cake brings.
For the last couple of years it has been one of my jobs on the Christmas list, because it can be quite time consuming and requires a fair amount of patience (not quite sure why it was given to me on the latter…). It doesn’t matter what you use to decorate it, as long as it’s personal, festive and appropriate for your audience - I’ve used ice-skating penguins before as well as baubles and making it look like a circular parcel.
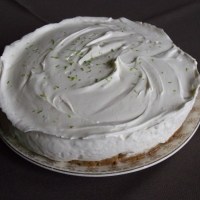
Of all the ideas we’ve had though, my favourite was last year’s round parcel. It is probably the most dramatic looking (and got a suitable ‘oo-ing’ reaction when we brought it out) one and the most fiddly to make, but it’s definitely worth the effort!
The Parcel Christmas Cake
The idea for this came from a picture cut out of a magazine years ago - I’ve no idea which. It ices a standard 20cm Christmas cake.
Ingredients
1 pack of supermarket roll out marzipan
1 pack of roll out white icing
40g of apricot jam
Melt the jam and spread it over your fruitcake. Roll out the marzipan and place it gently over the entire cake, ensuring that it is completely covered. If any spreads down onto the cakeboard use the point of a sharp knife to trim it to size. Leave for at least 12 hours to dry.
Measure the distance from the board to the top of your cake and then into the middle, make a note of the distance. Roll out the icing until it is about the thickness of a pound coin and carefully cut out the triangles. The easiest way to do this is cut it into rectangles in which the long side is the same as your pre-measured cake height & radius and the base is about 8 cm. Then cut the rectangles in half diagonally - hence two triangles of the appropriate size.
Layer the triangles one by one around the cake (starting at the cakeboard) so they overlap slightly - it helps to slightly wet the bit of the triangle that will have more icing on top of it, as it will bond together more easily. Do this until you get around the cake. If, like mine, it looks a little messy in the centre cut out a little circle and put a decoration, or icing bauble in the centre.
Et voilà! Everyone thinks you’ve spend hours icing the cake to perfection.

Edinburgh-dwelling, baking and food-obsessed, twenty-something adventure enthusiast. Runs on liberal amounts of coffee, cheese, cake and gin; bribable with same.


